
Decadent Chocolate Caramel Tarts | gluten-free & vegan
- Mary Draper
- Feb 3, 2025
- 4 min read

Updated: Nov 22, 2025
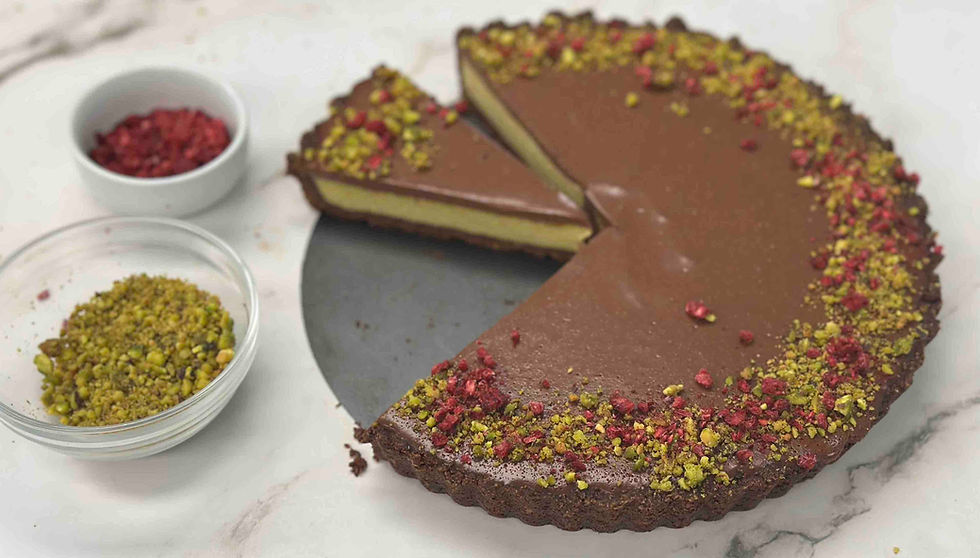
I am a SUCKER for anything chocolate OR caramel, but put them together, and OMG…. In this dessert we’ve got a perfectly tender fuss-free almond flour shortbread crust, oogy gooey no cook date caramel filling, topped with decadent chocolate fudge ganache. Wow.
Perfect for an elevated dessert after a special dinner (Valentine’s/Galentine’s is coming up!! 😉💝), or just cuz you love chocolate & caramel as much as I do…

Watch the full process/video, for more tips & tricks, and follow us on YouTube here: https://youtu.be/xV-Sgxye3dQ
Don’t have the cute little tart pans? You can use a disposable 9” pie tin that you can usually find at your local grocery store or dollar store.
This recipe is:
► gluten-free
► grain-free
► dairy-free
► egg-free
► vegan/plant-based
► naturally sweetened/no refined sugars
► no seed oils
► 100% delicious 🤤
⬇️ RECIPE ⬇️
Makes 1x9” tart or 4x4” tarts, with some leftover filling
ALMOND FLOUR SHORTBREAD CRUST:
(makes enough for one 9” tart or four 4” mini tarts. Feel free to double this and make 8 tarts as the filling recipes are double what you need)
► 1 1/2c almond flour
► 3 tbsp maple syrup
► 3 tbsp coconut oil, vegan butter, or red palm fruit shortening, softened
► 2 tbsp tapioca flour
► 2 tsp vanilla
► pinch of sea salt
NO-COOK THICK & GOOEY CARAMEL:
(makes enough for 2x batch or 8 tarts, if you don’t want leftovers you can double your crust recipe and make 8 or half this batch size. Same for the chocolate filling)
► 1/4 cup almond butter/cashew butter/peanut butter
► 1/4 cup maple syrup
► 1/4 cup coconut oil, melted
► 1/4 cup (62g) about 4-5 Medjool dates, pitted
► 1 tsp vanilla
► pinch of sea salt
CHOCOLATE FUDGE GANACHE:
(makes enough for 2x batch or 8 tarts)
► 1 can of coconut milk, chilled overnight (See below**)
► 1 cup (170g) chocolate of choice USE DIP/DRIP!!
► 1-3 tbsp maple syrup, to taste, depending on the choc you use. I did 1 tbsp to start and added one more
► 1 tsp vanilla
**Put your can of coconut milk into the fridge the day before. This allows the thick part to solidify and make it easier to take the thickest portion for our tart filling.
INSTRUCTIONS
CRUST
1️⃣ Combine ingredients in a mixing bowl. I like to start with a spoon or spatula then use my hands to get it to come together
2️⃣ If making one tart, chill the dough for 15 minutes before rolling dough between parchment, then flip and press into tart pan. For 4” tarts divide the dough (just roughly eyeball it or use a scale if you have one) and press into tart pans making sure to get the bottom fairly even, and to press it up all the side
3️⃣ Chill in fridge while you preheat the oven to 325F
4️⃣ Bake 20-25 minutes, until golden brown. (Smaller tarts need shorter time 20-22min, larger tart need longer 23-25min)
5️⃣ Let cool, then remove small tarts from their pans. If you have a hard time getting the bottom piece off, slide the tip of a knife between it and the crust, then twist the knife gently to get the bottom to pop off. For 9” crust, leave in the pan until serving.
CARAMEL
1️⃣ Combine ingredients in a blender and blend until all the dates have been broken up and the filling is smooth
2️⃣ Transfer to a microwave safe bowl (we may need to heat this up later)
CHOCOLATE LAYER
1️⃣ Take your chilled can of coconut milk out of the fridge and scoop off 1 cup of the solidified portion. If you don’t get a full cup of coconut cream from the can, top up your measuring cup with the liquid for a full cup. (The brand I like to use ends up almost entirely solid so I was able to use 1 full cup coconut cream which helps your tart set nicely.)
2️⃣ Combine coconut milk, chocolate & 1 tbsp of maple syrup in a microwave safe bowl and microwave in 30sec intervals until fully melted, and smooth
3️⃣ Add vanilla and stir well, then taste for sweetness and add 1-2 tbsp more of syrup if desired. For my chocolate, I felt like ours needed 1 more tbsp, but yours/your taste buds may be different.
ASSEMBLY
1️⃣ Check the thickness of your caramel - if your house is cold like our bakery, then it may have thickened significantly and be difficult to pipe. If so, microwave 15-30sec until it has loosened up. Stir, and transfer to a piping bag or zip-top/ziplock bag. Snip the corner and pipe 1/4” layer of caramel into the bottom of the tart shells. Save remainder to decorate tarts.
2️⃣ Transfer chocolate filling to a liquid measuring cup (or something else with a spout for easy pouring), and fill tarts to the top.
3️⃣ Chill tarts until chocolate filling is set/almost set, so it can support the caramel decoration. If you pipe caramel on warm chocolate filling, the caramel will sink.
4️⃣ Using the piping bag, pipe swirls/zigzags/etc on the top of your tarts. If the caramel has thickened again you can microwave it again for 10-20sec to get it flowing. Store in fridge until ready to serve.
5️⃣ Enjoy!!
#chocolate #caramel #healthydessert #glutenfree #grainfree #eggfree #vegan #refinedsugarfree #paleo #valentines #dessertrecipe #healthyliving #healthylifestyle #noseedoil #plantbased #naturallysweetened #coconut #decadentdessert #dairyfree
=================================
Bakery Instagram https://www.instagram.com/mindfulbakehouse/
YouTube Instagram: https://www.instagram.com/mindfulbakehouseyt/
My favourite 🇨🇦 products: https://www.amazon.ca/shop/mindfulbakehouse
Fav 🇺🇸 products: https://www.amazon.com/shop/mindfulbakehouse
=================================
ABOUT:
We're pretty new to blogging/YouTube and still trying to find our place - so please be kind, and let us know what you'd like to see more of!!!
4+ years ago I left my career in corporate pharma to open a gluten-free dairy-free paleo bakery to help others with autoimmune conditions & food restrictions. Come with us behind the scenes at our bakery, for gf/df recipes, product unboxings, and some visits to other bakeries.
These are affiliate links which means we make a small percentage from any sales


Comments